I happened across the Fedivision Song Contestt on Mastodon. I love things like this, though I’ve never before felt in a position to enter such a thing – but here I am. So here’s my effort. The song is called “Federation”, right on topic. Hit play below:
From around 1990 (yes, before the web existed!), I frequented usenet newsgroups like rec.music.synth, and the people there (some from Team Metlay, including Nick Rothwell) were very helpful when I was trying to build synthesisers, samplers, and effect processors as part of my degree course. The same people organised a CD compilation called “Musenet 1992”. I was intrigued by the practical logistics involved – there were version control problems, and lots of physical mailing of floppies going on; a CD-ROM burner cost thousands, so they needed to raise funds to get a real CD pressed. I paid whatever they were asking at the time (which I recall involved using telnet to cdbaby, one of the first online stores, ever), and a couple of months later, I received my double CD.

Listening to it now, I’m still impressed by the quality of some of the entries, in an era that pre-dated digital recording technology. I also love the more loopy entries, especially Mark Wheadon’s “One more hack”, which remains topical.
The Fedivision Song Contest is in much the same vein, though one key difference is that there is actually a theme – the fediverse itself.
In case you’re unfamiliar with it, the fediverse is an umbrella term for services that are (or can be) self-hosted, and connected to other similar instances through a set of common federated communication protocols. It’s frequently held up as a more democratic alternative to monolithic social networks like Facebook and Twitter. It has parallels with the rise of interconnected bulletin boards in the 1980s – little islands of civilisation (or maybe not!) talking to each other, eventually coalescing into what we now think of as the internet. The fediverse is a far more ambitious, bigger, faster, more dynamic return to that ideal. Instead of an individual, a university, or a government toeing the line of some faceless corporate monstrosity (that would be you, Facebook), each of these entities can set up their own instance of, for example, Mastodon (a bit like Twitter, but without the evil dickhead in charge), manage it exactly as they deem appropriate, and connect it to the myriad other Mastodon instances so they can all talk to one another, you know, social networking in its true meaning.
Anyway, such is the romance of the fediverse, that it’s been busy building its own culture, hence the appearance of this fedi-friendly song contest 4 years ago.
Federation: the song
I wanted to have a strong minor/major contrast to reflect pessimism in the current state of social networks, and the shiny, naïve optimism of the fediverse, so the verses are sad laments, but the chorus reflects hope. I took inspiration from what I was listening to at the time, which happened to be Yello‘s 2009 album “Touch”, in particular the track “Till Tomorrow“, on which I love Till Brönner’s breathy trumpet parts. I’ve liked Yello for decades (I hope to be as cool as Dieter Maier when I’m that age!), especially their affection for atmospheric sub bass, synths, percussion, and trumpets. I played trumpet for about 7 years at school, but was never much good at it; while I prided myself on my tone, the notes often proved troublesome. I often find I’m listening to a song and think “I could write something like this”, start out copying it a fair bit, but then it gains a life of its own and heads off in unexpected directions. You can hear that in this song, where the intro section is quite Yello-ish, but then seems to have made other plans.
Verse

We’re all in this together,
at least I like to think that that’s so.
It’s getting harder to build bridges
over the sea of trolls below.
We’re feeling more like castaways
on our lonely little islands in the streams,
throwing messages in bottles into rising tides
of thoughtless indifference.

Chorus

The future lies in federation,
forging friendships from afar.
Turning islands into nations into continents;
it’s up to us to raise the bar.

The future lies in federation,
forging friendships from afar.
We need to choose our neighbours wisely, break the monolith;
It’s time to aim right for the stars.

Verse

The billionaire moderator,
the kind of guy that you don’t want to know,
bows down to the kleptocrats
and you know he won’t let it go.
We’re building ‘cross countries, near and far
a place to call home, to belong.
It’s a slow exodus, the beginning of something,
work back to where we went wrong.

Chorus

The future lies in federation,
forging friendships from afar.
Turning islands into nations into continents;
it’s up to us to raise the bar.

The future lies in federation,
forging friendships from afar.
We need to choose our neighbours wisely, break the monolith;
It’s time to aim right for the stars.
As usual, this song was built in Apple’s amazing Logic Pro X. I wanted to make sure I only used instruments that I could set up on my new MacBook M3 Pro (music software licences are notoriously strict and DRM-ridden), so it’s mostly using stock instruments, which to be fair are great. There are no audio recordings at all – everything is synthesised. The bass and big synth pad are Logic’s RetroSyn. Drums are Logic’s Drummer with the Speakeasy brush kit. The twinkly metallic chords are from Alchemy, trumpet from Studio Horns, and there’s a little Korg WaveStation for the high chimes. EQs, compressors, delays, and reverbs are stock Logic plugins.
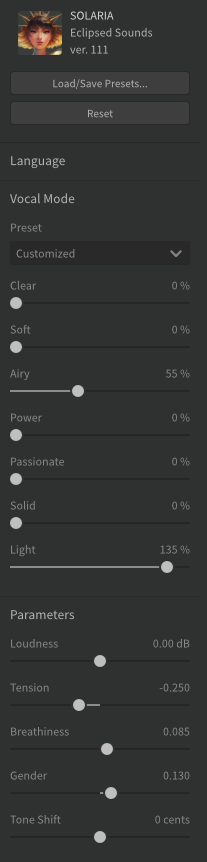
The jewel in the crown is of course Dreamtonics Synthesizer V Studio Pro (SV) with the Solaria voice database, which sings the lead and backing vocals in a way that I never could. Many of the tracks I hear using SV are quite mechanical, doing the equivalent of quantising everything with robotic efficiency, but you can spot that, so I’ve gone to some lengths to push things away from rigid timing, trying to make it sound more natural, especially at this slow 95bpm tempo. The timing is a little tricky as the drums swing a bit (how can you not, with a brush kit?), and it was difficult to avoid having the bass sounding slow and laggy if it wasn’t swinging the same way. I just love using SV for backing vocals, as you might be able to tell.
The lyrics are somewhat earnest, worthy, and naïvely optimistic, and squarely aimed at the aspirations of the fediverse – we can all hope, right? The mentions of “islands in the streams“, and “messages in bottles” are sort-of deliberate, and you can even see a reference to “bridge over troubled water” if you squint a bit. I felt compelled to include a bit of abuse for you-know-who. I’m particularly pleased with managing to squeeze in “break the monolith”, which is something of a theme in fediverse development, though not related to Martin Fowler’s treatise. The excessive alliteration in the chorus was almost entirely accidental, honestly.
I had a play with passing an SV vocal line into Audimee, which is one of these new AI services doing freaky things with LLMs, and here the service will re-sing vocal tracks using different voices. The results are pretty amazing, but it doesn’t preserve the timbre of the original, so for example in this song, it can’t reproduce the switch from the breathiness of the verses to the stronger clarity in the chorus. That said, it is really believable. Though it won’t improve the actual singing as the results are more like altering treble and bass; imagine having a knob you could turn to switch singers, but retaining the exact pitch and timing of the original, however good or bad they might be. Feeding in generated vocals from SV works really well (they’re obviously super-clean “recordings”), and the output sounds very natural, but lacking in the variation that SV provides, so I didn’t use it – but maybe next time.
If you like this song, please consider supporting me by buying my albums on Bandcamp, and sharing links to my music on your socials.
Update: In the final results, this song placed equal 11th (out of 72 entries), with 24 votes. I’m looking forward to doing better next year!