Mud vs Sheep vs Bike (MvSvB) is an event that my friend Fraser and I started in about 1993. I’ve written about it on here before. Essentially it’s just a bunch of friends going mountain biking in Wales, but it has achieved a kind of independent existence in our collective consciousness. It’s loosely named after the famous “Man vs Horse vs Bike” race that I regretted once entering in about 1991. MvSvB has been held at various youth hostels and other group rental accommodations, but most often at what was my Dad’s farm near Llandovery in Wales.
Certain MvSvB traditions have been established, most importantly:
Banoffee pie is a critical component of the coping mechanisms required to spend much time in Welsh weather, and is a great source of the calories required for biking up hills (at least that’s our excuse). Some terms for the unaware: liquid sun = rain, Welsh not raining = light drizzle.
I’ve designed most of the T-shirts to date, starting in 1995, when I learned that half-toning really isn’t a good approach for screen printing on fabrics. The designs usually tried to have 1 or 2-colour prints using strong mountain bike themes with in-jokes, references to mud, sheep, bikes, hills, etc. This year I came up with a bold design, based on a picture of a friend on a bike, carefully redrawn with an Apple Pencil on my iPad (using Linearity Curve), and printed using a groovy high-tech direct-to-fabric printing process by my friends at Vektor.
Since I moved to France in 2009, I’ve missed out on a few events, Fraser moved to New Zealand, we’ve mostly had growing kids to contend with, the whole age thing, and so MvSvB events have dwindled. But 2023 is the comeback year, the kids are big enough to leave at home, and we can reunite to enjoy a collective mid-life crisis.
To commemorate what we are officially calling the 30th anniversary of MvSvB, I wrote this song about it, celebrating all the nasty weather, excessive eating and drinking, impromptu bike maintenance, and generally messing about on bikes with friends.
I came up with the first line first; always a good start. I wanted to have a sparse, slightly gloomy sounding verse so that I could pair it with an excessively happy chorus. Of course It just would work without rain ambience and bike and sheep noises. Next up came the bass line; I’ve never really played slap bass before (on my Sire Marcus Miller M2 bass), but I am pretty happy with the result – I’m sure it sounds better than when I played it due to the wonders of Logic Pro’s flex pitch editor! Next was the guitar, which is very simple. Drums are courtesy of Logic’s excellent Drummer instrument, which I got to follow my bass part in places. I had quite a lot of lyrics for the chorus, and despite the 130bpm tempo, it manages to sound fairly leisurely. The timing of those lyrics gave me a pattern which led to a melody, which led to some very basic chords, and voila, one functioning chorus!
I’ve been very keen to try out Synthesizer V, which I had bought at fair expense earlier this year, only to find that it’s borderline unusable in DAWs like Logic. However with a little perseverance I found it was workable so long as I didn’t even consider touching the tempo. This gave me the first set of vocals – two backing lines that I made in a similar style to how I worked in Tailwind, except with these synthetic voices. I had planned to sing the main parts myself, but found it just really didn’t work, so I enlisted the help of Lucas H on Fiverr who did a great job with a quick turnaround. With all these working together, I’ve ended up with 5 vocal parts in some places, and it makes for a great ensemble sound that I wasn’t quite expecting, but I’m very happy with.
I don’t care if it’s raining,
get back on your bike
I know you’re hung over
from drinking last night
But that’s not my problem
there’s mountains to ride
and there’s no way I’m
letting you stay inside

Sheep getting restless
and puddles so deep
there’s mud to my elbows
and I’ve had no sleep
but I don’t care
‘cos we’re here to have fun
to every last drop
of this liquid Welsh sun

There’s mud and there’s sheep and there’s rides with our friends
There’s banoffee and T-shirts and hills without end
There’s maps and confusion and roads to nowhere
There’s mud and there’s bikes and that’s why we are here

No punctured excuses
or unspoken wheels
we’re chained to the bars
as we grind up the hills.
We’re spinning for summits
and covered in grime
leaving tread on the tracks
of a great mountain climb

There’s mud and there’s sheep and there’s rides with our friends
There’s banoffee and T-shirts and hills without end
There’s maps and confusion and roads to nowhere
There’s mud and there’s bikes and that’s why we are here

Pedal, pedal... up the hills
Pedal, pedal... up the hills

There’s mud and there’s sheep and there’s rides with our friends
We always come back here, again and again
There’s mountains and rivers and crates of cold beer
There’s mud and there’s bikes and that’s why we are here
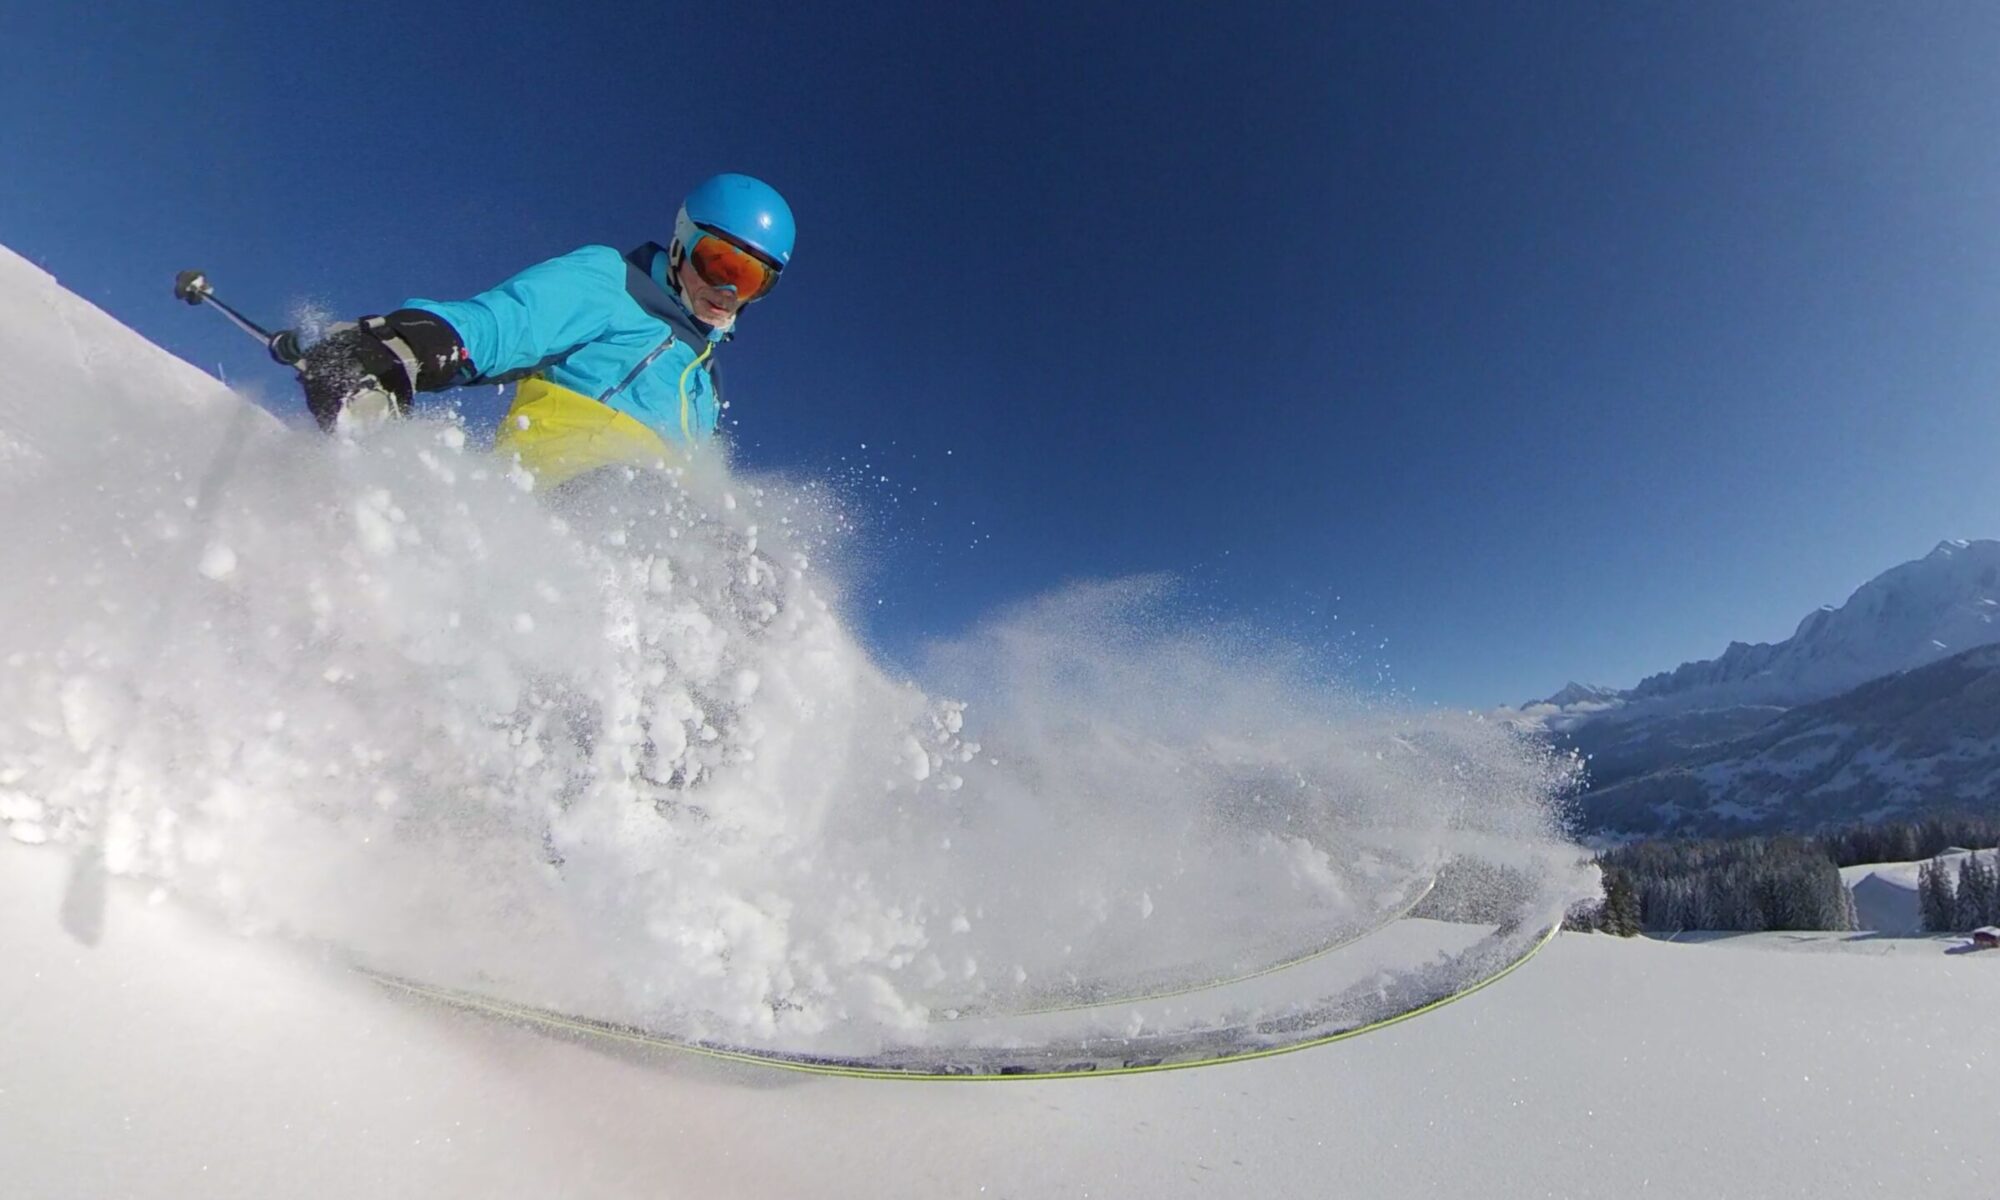
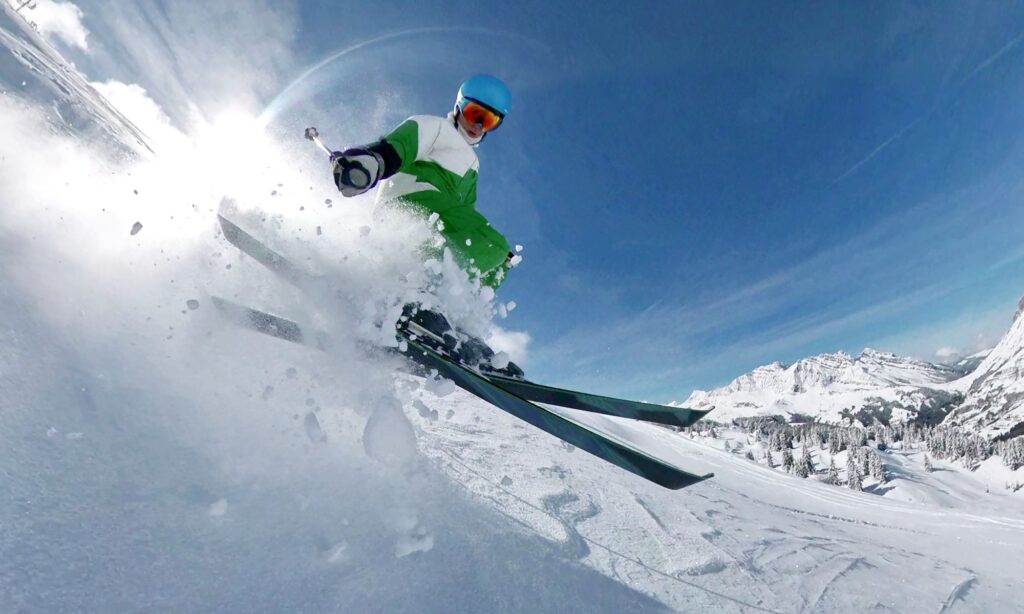
I post skiing videos fairly often, and people keep asking me how I make them, since by most normal understanding of shooting video, they seem like magic.
Skiing fast in Combloux, France on a nice sunny day, filmed by my talented, invisible friend
Is there a drone that follows me? Do I have a friend that can ski backwards very fast while filming, staying out of shot, and not casting a shadow (a vampire?)? Nothing quite so exotic, but it’s still pretty clever.
The Camera
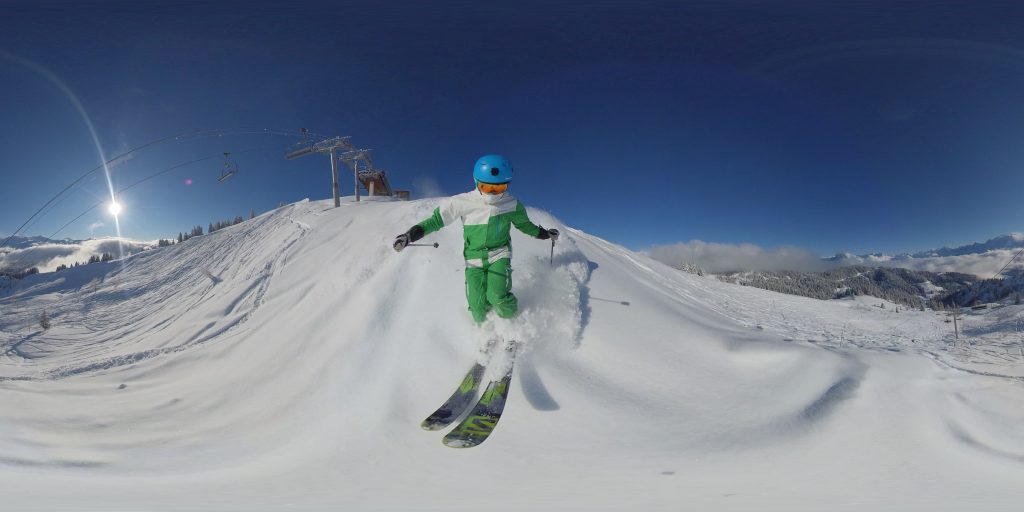
I use an Insta360 One X camera. As you might guess from its name, it shoots 360° video, that is, it captures a complete sphere, looking in all directions at once instead of just a rectangle pointing in one direction. It achieves this by using two cameras and two fisheye lenses, mounted back-to-back, each capturing slightly over a 180° field of view as two square images. These are then mapped into a 2:1 rectangular representation (which conveniently works with common image and video formats like JPEG and MPEG-4) where the poles are the top and bottom edges, which implies a lot of distortion, a bit like a Mercator map projection. This is a full spherical frame image in this format – the distortion is clear (my skis are not the size of surfboards), but the pixels on the left and right sides will match when wrapped around:
A spherical image mapped to a 2:1 rectangle
The combined resolution of these two sensors is 5.7k (i.e. more than 4k), however, you need to bear in mind that all those megapixels have to cover a complete sphere, so you really need it to be this high if you’re going to render out videos that only look in one direction, and thus only use a small portion of the original view.
The “slightly over 180°” field of view is important as it means that when the two video streams are combined, there is a discus-shaped region centred around the camera that is hidden from view, and this is used to make the camera itself (and the selfie stick it’s mounted on) effectively invisible, without having a visible discontinuity (join) between the two image sources.
It’s possible to see the join sometimes, especially when only one lens is exposed to the sun – modern optics are good, but there’s only so much they can do! In this weird perspective, the join is running roughly vertically a bit to the left of me, roughly perpendicular to the lens flare ray from the sun, which stops at the join. The sky is slightly lighter on the left side of the join, probably due to lens flare:
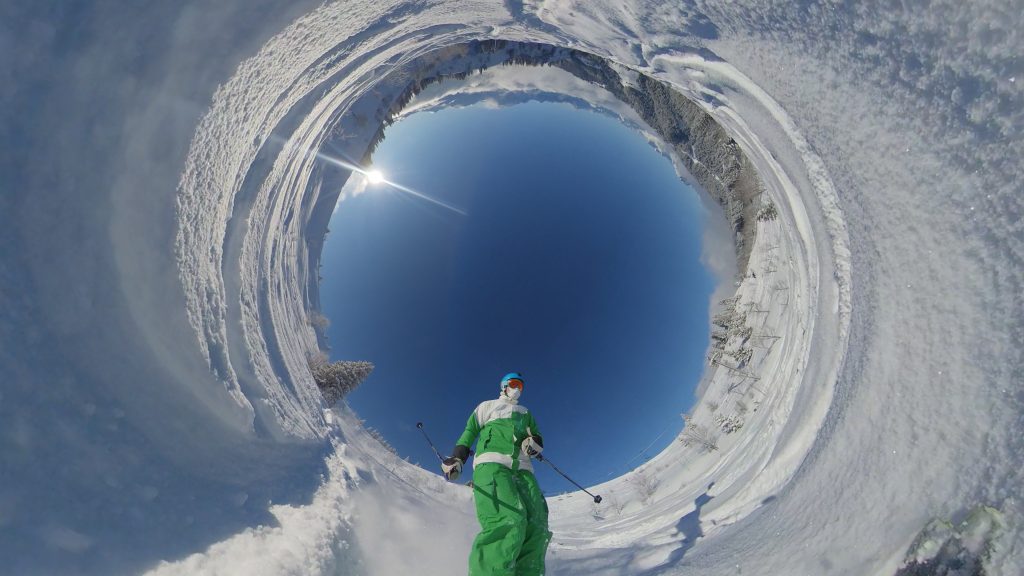
You might have noticed that using spherical images requires a new perspective (ha!) on taking pictures and planning shots; Since you can rotate the view in all directions and zoom in and out, you can produce some very unusual perspectives that are not possible any other way. In the image above, the camera is effectively looking straight up and is zoomed out a long way, so the horizon around it appears as a circle.
One advantage of fisheye lenses is that they have effectively infinite depth of field, so everything is always in focus, and it doesn’t need autofocus. On the other hand, you’re not going to get any subtle bokeh effects!
Stills
You can extract still images from the video stream as either rectangular frames, or full 360° images (as I did above). The camera has a higher-resolution stills mode, however, that’s not really possible to use at speed. The stills quality from video streams is remarkably good.
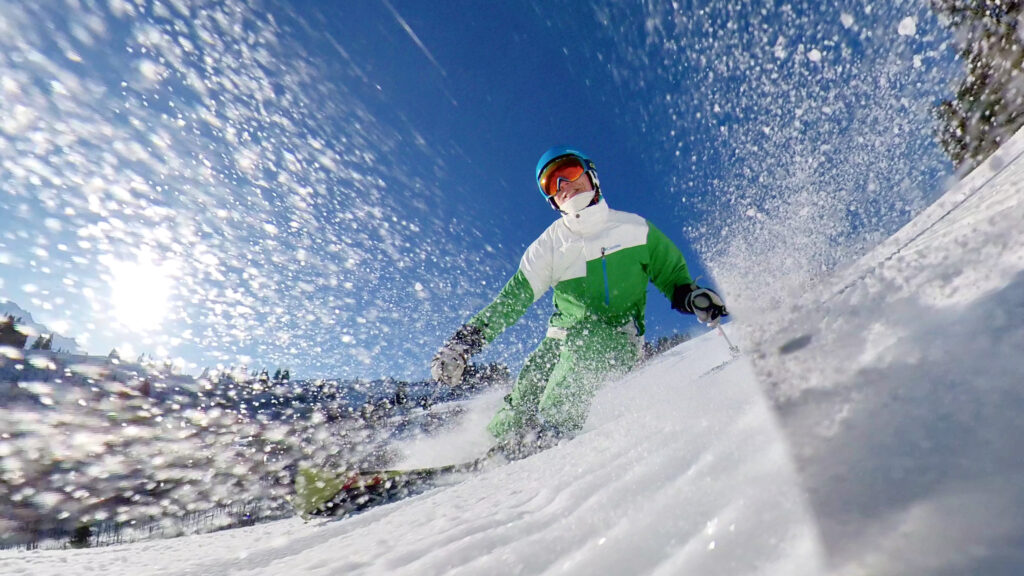
I’d be delighted if someone had taken this picture of me (no doubt after much setup) – that it’s a selfie is borderline miraculous!
I’m particularly pleased with this shot – the spray of snow was caused by the camera hitting the ground at speed, and the camera itself made a gap in the spray, which happened to line up with me!
Stabilisation
The camera has “FlowState” stabilisation, which uses accelerometers and gyroscopes to keep track of where the horizon is and keeps it flat and steady, regardless of what angle the camera is held at – when you’re filming in all directions at once, it doesn’t really matter which way the camera is “pointing”, in fact the whole concept of pointing it at something doesn’t really apply. This stabilisation is extremely good, keeping things nice and smooth even during really quite violent movement and vibration, but it’s also partly responsible for the viewpoint feeling disconnected from the subject.
Mounting
The traditional place to mount an action camera like your average GoPro for skiing is on top of your head, attached to a helmet. That’s fine as it points forwards, but it means you never star in your own movies, and the resulting footage tends to be pretty monotonous. Mounting a 360° camera there is going to be a bit dull too – it means you lose the view of the ground because your helmet will get in the way, but your friends might be nicely captured. To get a nice perspective on yourself, you need to shoot from a bit further away – selfie stick to the rescue!
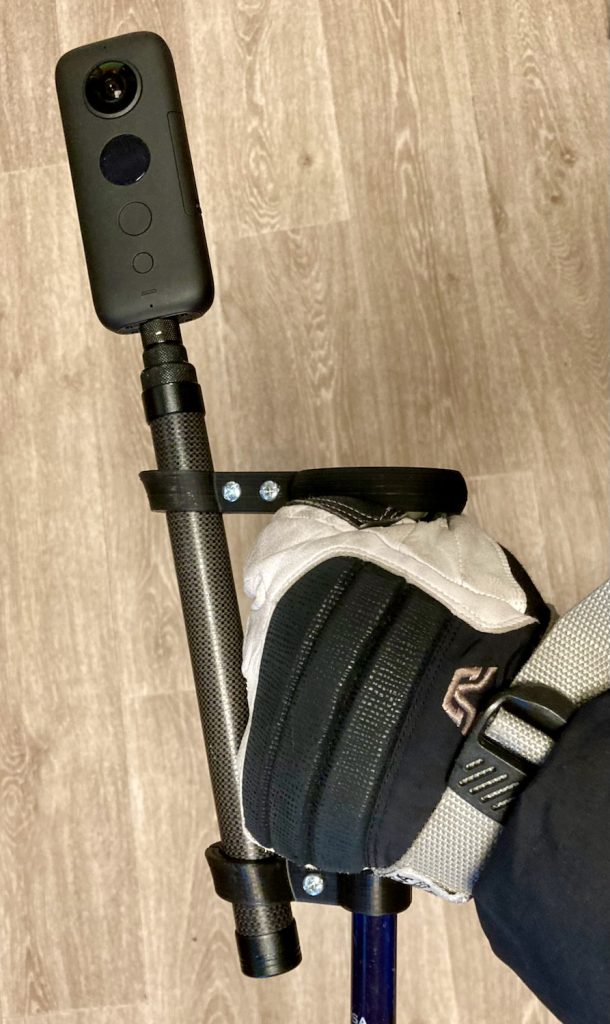
The camera isn’t that heavy, but when it’s waggling about at the end of a 1.2m carbon fibre telescopic selfie stick in a fast moving situation, it can be hard to control. When skiing you use your hands for holding your poles and partly for balance, and it’s actually painful to hold stick and pole at the same time. To counter this, I designed and 3D-printed a mount that clamps the stick to my ski pole fairly rigidly, and also offsets the angle a bit – otherwise there would be a risk that the “invisible selfie stick” feature would also make my ski pole disappear, but it also gives you a bit of creative control as you can easily move it between front and side viewpoints with a twist of the wrist.
The camera mounted on my bracket – finger space is a bit tight with fat gloves on
This mount is a great improvement, and makes for much steadier shots and safer precarious camera positioning (like 2cm from the ground at 100km/h!). You still lose a bit of motion in that arm (watch how little my left arm moves compared to my right in the video above), and the balance of your poles changes a lot, but it’s quite workable.
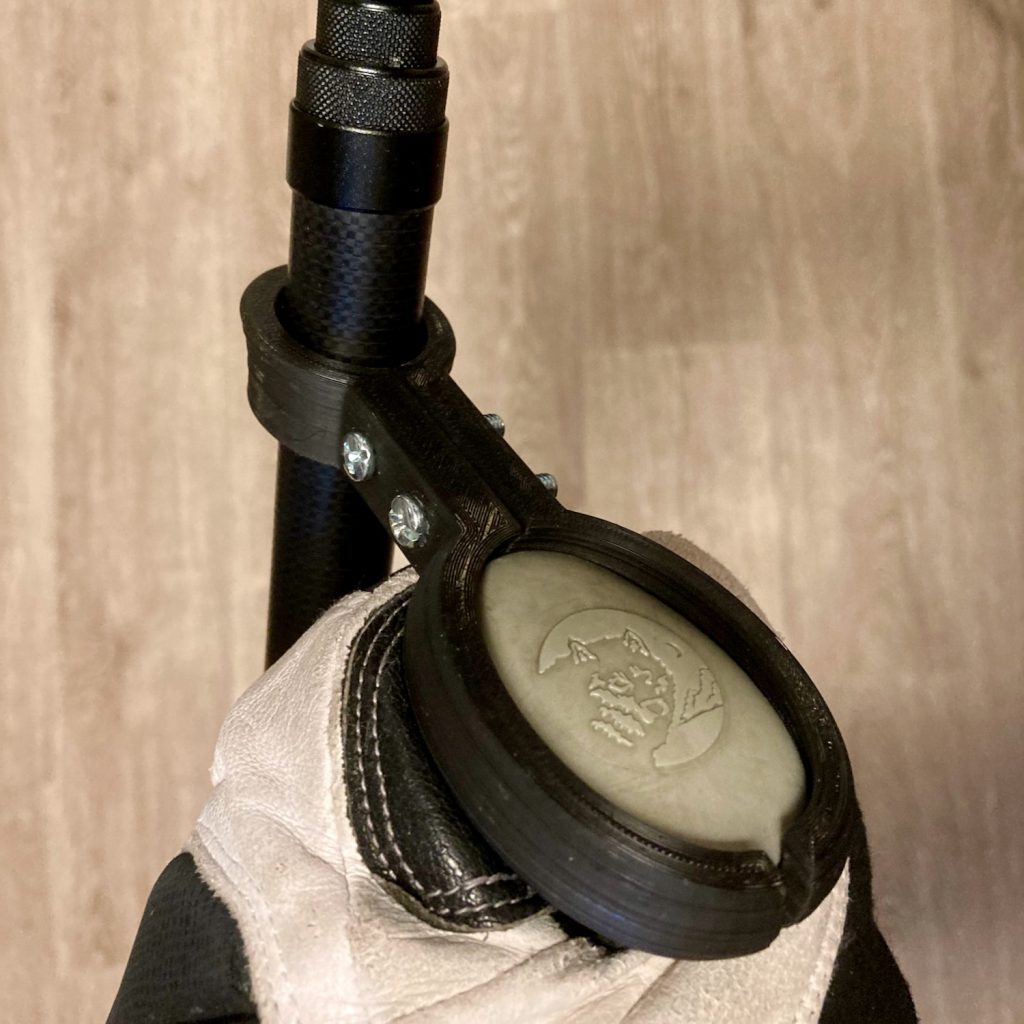
My ski pole mounting bracket, top view
Snowboarding is a bit easier because you have your hands free, and the results can look straight out of a video game:
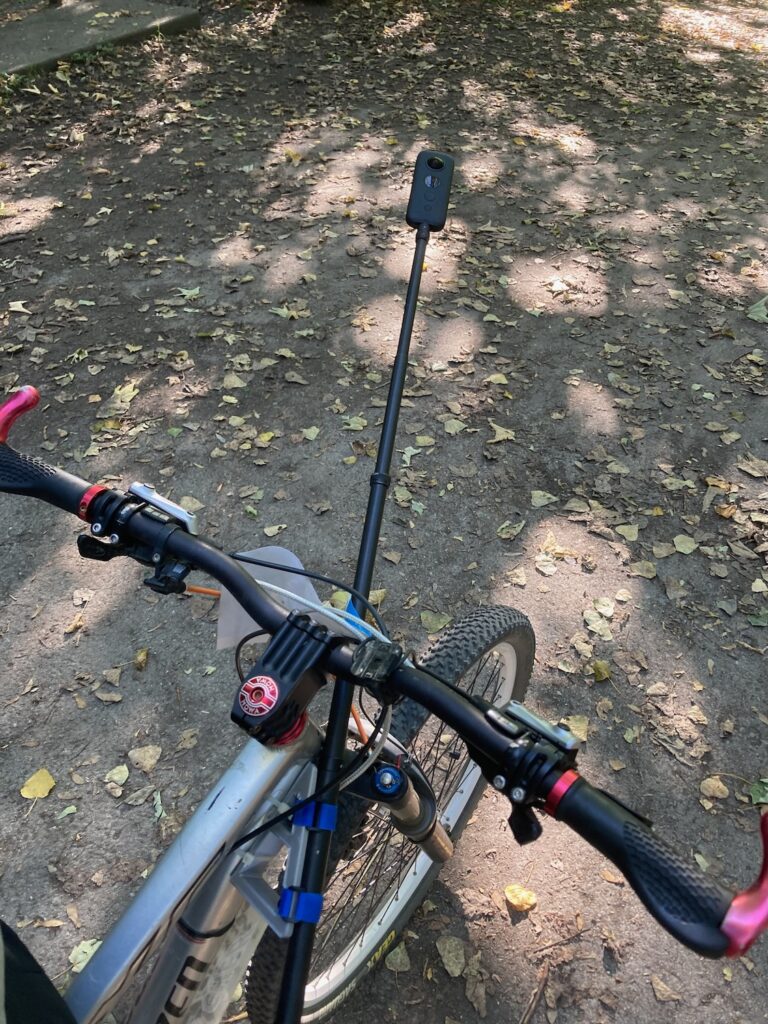
I also printed a bracket to mount it on my mountain bike’s down tube, and this taught me a couple of things: Vibration on bikes is much more violent than on skis, so the selfie stick rattles (the telescopic parts rattle inside each other) and wobbles a lot more; you go a lot closer to things on a bike, and it’s easier to hit the camera.
A new take on jousting
The end result still looks quite cool though.
Editing
Insta360 have an iPad & iOS app called… Insta360. The iPad version is great, but the phone one is quite usable too. You have a choice of aspect ratios, trimming and editing, adding soundtracks, colour enhancements, filters, and more. As well as nicely smoothed view angle and zoom factor manual edits, it has some very clever features for auto-tracking a subject. Remember that if you’re rendering out a normal-looking video, as I’ve done here, it’s not just that you can choose your view angles – you have to; clips of the ground whooshing by or the tops of some trees and a bunch of clouds are not that interesting!
The software has some enhancement filters, though they are not very controllable – you can’t for example just “make it brighter”, you have to pick a filter preset that happens to look like what you want, then twiddle an amount slider. The dynamic range is really good – notice that in all these clips you can still see the snow texture in direct sunlight, the highlights are not blown out, yet there is still detail in dark areas.
Extras
Insta360 have some other mounts that could be interesting for skiing including a back mount that puts the camera above and slightly behind you for a 3rd-person perspective – just don’t ski under any low branches, and be careful on chairlifts!
They also have a GPS Action Remote gadget, which in addition to controlling the camera remotely, injects a GPS data stream into the video recording. In the editor this data can be used to drive on-screen speedometers and maps. I’ve not tried that, but I’d love to given that I’ve long had a thing about going quite fast. Here’s a clip of me doing that on the Mont Fort World Cup speed skiing track in Verbier, now sadly defunct due to the glacier’s retreat, which also shows how much video quality has improved since 2013 (it was shot on a Contour 1080p camera):
At the start you can see just how steep this is! I managed 147km/h (92mph) on this run.
Posting online
For the most part I share videos via Mastodon, Twitter, and Strava. All of these have similar restrictions/requirements for videos regarding size, video format, bit rate, duration, etc. I usually render full-resolution output from the Insta360 app at 100Mbit/sec, do any simple edits using LosslessCut, and then compress for final output using ffmpeg. The ffmpeg command I use is:
This compresses to just under 5Mbit/sec using the H.264 codec (sadly, vastly superior H.265 video is not accepted by these sites yet), scales the video down to 1280px wide (720p), sets the pixel format that most of these sites want, and also includes a 90% audio volume reduction, as it’s just really noisy otherwise.
Youtube has support for 360° videos, however, I find that these are actually mainly annoying to watch; rendering out a conventional rectangular clip just works better for me, and I’m the director around here…
Gripes
There are a few annoyances with this camera:
The tiny OLED screen is completely unreadable in bright sunlight.
There are only two buttons to navigate through all its menus and options, but I never know which one to press.
It’s very picky about the SD cards it will work with, though that’s understandable.
The battery life is reasonable, even in the cold, and while I printed a lens cover, the lenses seem to be surprisingly resistant. It doesn’t mind getting covered in snow. For some unknown reason, the 3 threaded sections of the selfie stick use a left-hand thread, which is annoying as it means that the action of tightening the camera undoes the selfie stick.
The One X is a few years old now, and Insta360 have since released newer One X2 and X3 models which solve the screen and controls problem by adding a small touch screen that’s more readable. It also makes the standard case a bit more robust and waterproof, has a bigger battery, better image sensor, and improved audio. Should Insta360 like to give me one to test, I wouldn’t say no!
What an excellent weekend! Driving up to Slimbridge in the pouring raid hearing flood warnings on the radio filled us with a certain foreboding, but it was great! Real proper mud, a sprinkle of rain, some excellent biking (but not too much!), brilliant company and excess food as usual!
My new cranks fared very well, freshly serviced cables a big improvement, especially the front shifter. I’m still not fit enough though – my shoulders and my bum still ache!
The T-shirts went down very well, pretty pleased with mine.
On top of all that, it was a very happy 40th birthday party (if a little early) for Fraser.
Luc learned to say “Dog”, “Duck” (there were lots) and finally figured out how to say “Bye Bye” instead of just “Hello”!
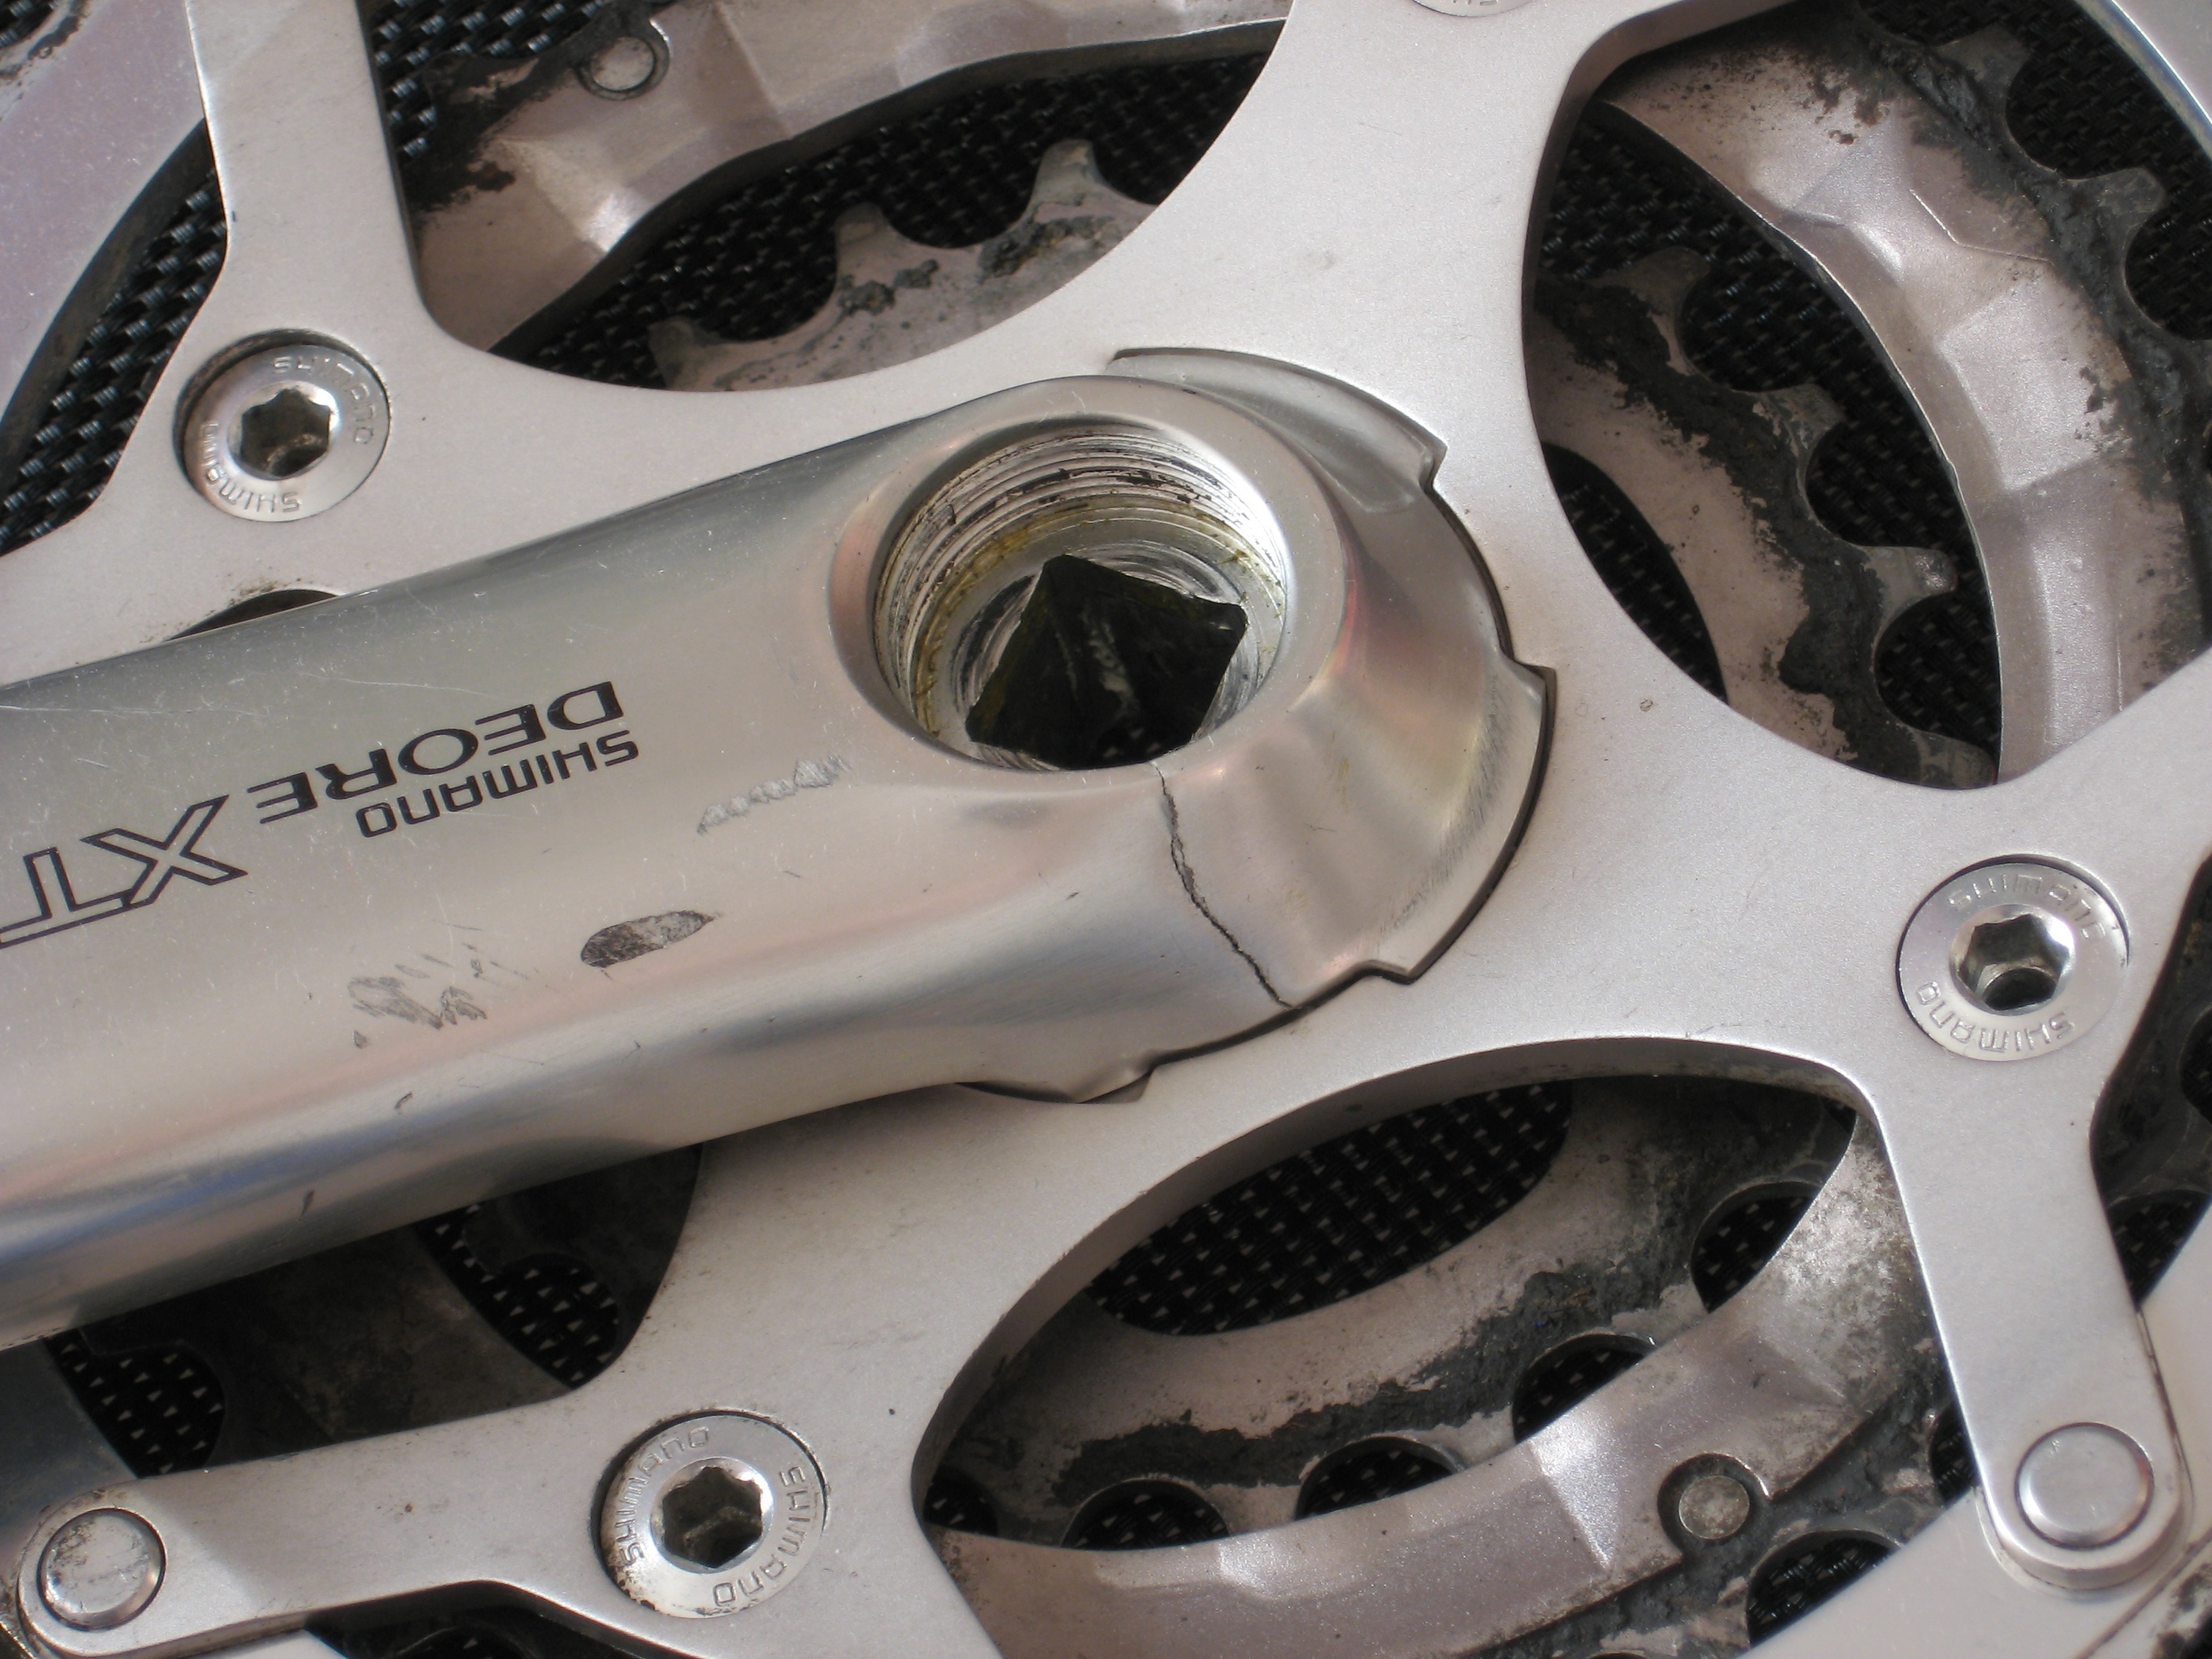
Last Sunday I was doing some interval training on my turbo trainer when I noticed a nasty mechanical clicking sound from somewhere around my bottom bracket. It sounded just like a cracked bearing, so I borrowed a crank extractor, took the cranks off, only to find that my BB bearings were absolutely smooth, no sign of a problem at all. Mystified, I put the cranks back on, and while I was doing that, noticed that the left crank was cracked from centre hole to the outside of the spider, all the way through. I’m very glad I wasn’t riding when it finally went! XT stuff isn’t meant to do this!
It turns out that it’s more or less the same price to have a new combined BB and chainset rather than just replacing the old taper-fit chainset, and it should be lighter, stiffer and stronger into the bargain. So Chain Reaction delivered me a nice Deore LX Hollowtech II chainset, and Brockley Cycle Team fitted it for me today, along with some good advice.
 What an excellent weekend! Driving up to Slimbridge in the pouring raid hearing flood warnings on the radio filled us with a certain foreboding, but it was great! Real proper mud, a sprinkle of rain, some excellent biking (but not too much!), brilliant company and excess food as usual!