Postman pre-request script for Laravel registration

A common way to register in a Laravel API is to send a POST request to /users containing a username, password, any other info, and also an HMAC signature using a server-side secret. In this example, it’s validated on the server by this class:

    public const HASH_ALGORITHM = 'sha256';

    protected const REQUEST_KEYS = [
        'email',
        'name',
    ];

    private $secret;

    public function __construct(string $secret = null)
    {
        if (! $secret) {
            throw new \InvalidArgumentException('The registration secret must be provided');
        }

        $this->secret = $secret;
    }

    public function verify(Request $request): bool
    {
        return rescue(
            function () use ($request) {
                $hash = hash_hmac(
                    self::HASH_ALGORITHM,
                    json_encode($request->only(self::REQUEST_KEYS)),
                    $this->secret
                );

                return hash_equals(
                    base64_encode($hash),
                    $request->get('signature', '')
                );
            },
            false
        );
Code language: PHP (php)

So we can see that it’s expecting a Base64-encoded HMAC-SHA256 signature of a JSON array containing the email and name properties.

If you’re trying to make this request in Postman, you obviously need to calculate this same signature or it won’t work. Fortunately Postman has pre-request scripts that can inspect bits of your request and environment and generate new elements before your request is sent, and that’s what we need to use.

We don’t want the secret to be saved in our request collection, so we keep it in an environment, and pull it out dynamically when the request is made. Postman includes the Crypto-js package, which includes the necessary signature and encoding functions we need. Coming from PHP, the syntax for these operations feels very convoluted, but it goes like this:

const signature_string = '{"email":"' + request.data.email + '","name":"' + request.data.name + '"}';
const hmac = CryptoJS.HmacSHA256(signature_string, pm.environment.get('REGISTRATION_SECRET'));
const b64 = CryptoJS.enc.Base64.stringify(CryptoJS.enc.Utf8.parse(hmac));
pm.environment.set("REGISTRATION_SIGNATURE", b64);Code language: JavaScript (javascript)

This builds the string to sign from the request elements we need, calculates the HMAC of it using our secret, and then base64-encodes it before saving it in the Postman environment.

You can then add the signature into your request by adding the REGISTRATION_SIGNATURE variable to the body:

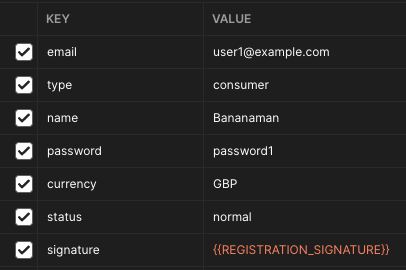
Hope that helps someone!

Reverse engineering Fox’s Butter Crinkle Crunch biscuits

Update 24th Jan 2024: I wrote a follow-up post to this.

Fox’s Butter Crinkle Crunch biscuits have always been a favourite of mine. I had a little rummage, but completely failed to find a recipe for them, so I though I’d try making one up.

Home made butter crinkle crunch biscuits

Fox’s page on the biscuits is oddly free of marketing, but includes both the the ingredients list and the nutrition label, from which we can deduce something of the recipe. The ingredients list noted 8% oats and 5% butter, no eggs, and a critical ingredient I’d not thought of – partially inverted refiners syrup. That’s golden syrup to you. Taking those with some of the nutrition label led to make some guesses about the proportion of ingredients. I did a little searching about ginger snaps, a very similar biscuit texture-wise, which gave me an important tip – “go heavy on the raising agent”. This is what makes the biscuits over-rise and form the distinctive “crinkly” cracks. I then compared my recipe with Rachel Allen’s recipe for ginger honey biscuits (from her “Bake” book, ISBN 978-0007259700), which I’ve made before, and made a few adjustments to quantities, before settling on a recipe.

Ingredients

  • 175g white flour
  • 75g white sugar
  • 25g dark muscovado sugar (adds a slightly caramel-y taste)
  • 50g oats (porridge, not jumbo)
  • 125g butter
  • 50g golden syrup
  • 2tsp baking powder
  • Pinch of salt
  • 1/4tsp vanilla powder
  • A small bowl of Demerara sugar (cassonade in France) for rolling

This is about 500g of ingredients providing eleventy bazillion calories, and made 24 large-ish biscuits.

Steps

I used a Kenwood Chef to make this, but it’s easy to do by hand too. I baked them on a large double-layer tray with a silicone baking sheet.

  • Preheat oven (traditional mode, not fan) to 180°C.
  • Put all the dry ingredients except the sugar in a bowl and mix.
  • Put butter, sugar (not the Demerara!) and golden syrup in the mixer bowl and whiz until it’s creamy.
  • Add the dry ingredients and whiz until it forms a thick, slightly crumbly dough with no small crumbs. It should be fairly dry, not sticky. If it’s sticky, add a little more flour.
  • Grab small 2-3cm blobs of dough and roll them between your palms to make them into smooth spheres, then roll them in the Demerara sugar before putting them on the baking tray. Leave quite a lot of space around them as they will spread a lot when baking.
  • Bake for about 16 minutes on a middle shelf. They will initially rise to look like little cakes (which had me worried!), but after about 10 mins the tops will crack and they will flatten a bit. I wanted to make sure they were nice and crunchy; if you prefer them softer, take them out a little sooner.

I made a time lapse video of them cooking, but the camera focused on the little dots on the oven door rather than what’s inside, so the biscuits are a little blurry:

Biscuits cooking

They looked pretty good in the end and taste pretty much as I expected, though lacking that blatant butteriness that the originals have, possibly due to my lack of a listed ingredient: “Flavouring”! Still yummy though.

I think if I made them again I’d cut down on the sugar a bit, perhaps increase the oats, though I don’t want to stray into Hob-Nob territory! I could make them look more like bought ones if I squashed them a bit before baking so that they come out flatter.

My modelling career

No, not that kind of modelling! For a very long time I’ve enjoyed making model kits. The first time I ever encountered them was when I was about 6 when we visited a family and their son (about 9) told me all about this thing called “Airfix”. To start with I thought this was some kind of weird glue, but then he showed me some he had built (the staple WWII fighters – Spitfires, Hurricanes, and ME-109s) and I was quite envious.

I don’t remember building many plastic kits to start with, but I did make rubber-band powered flying models from balsa. These require a lot more care and work than plastic kits, but they are very analogue, and you get more of a feel for the materials. I think the smell of cellulose dope helped too. The problem with real flying models is of course crashing them. Balsa and tissue paper are not very robust, and seeing hours of work smashed in seconds is no fun. Modern equivalents tend to use moulded expanded polystyrene, which is both lighter and more crash-resistant, but rather less romantic, and doesn’t smell as good.

Model makers accumulate a certain amount of junk. I still have plenty in my box of goodies:

This box reveals a certain history of its own. Beatties was a British chain of model shops that closed in 2001 – yet their glue and paintbrushes still work just fine 19 years later! Tamiya’s acrylic paints were so much better than Humbrol’s gloopy enamels, and they have lasted too – some of these are probably 25 years old! Of course, everybody needs a few plastic dinosaurs, starfish, and a Paua shell.

I’ve always been more interested in the process of making models than playing with them afterwards, and to some extent I’ve found much the same about writing software – writing it tends to be much more interesting than using it. Last year I had a great time building a retro arcade game cabinet – I spent far more time building it than I have playing games on it!

Back in the dot-com boom I landed a very lucrative CD-ROM production contract (you know, where all the web technologies started before they worked on the web!) for the Open University, allowing me to buy a very nice car after a mere 7 weeks on the job – a silver 1991 Porsche 944S2:

This was a fun, fast, but expensive car to own. It was surprisingly practical: On one occasion my wife and I drove from London to darkest Wales with our luggage and three mountain bikes inside the car. On another trip the clutch was on its last legs and I managed to drive from Newport in south Wales to Sidcup in Kent (190 miles) without changing gear once. I kept the car for 4 years, until we lived in Paris. I can say quite definitively that you do not want to own a nice car if you live in Paris. After I sold it I built a model of it as a memento.

Some friends (hi S&P!) bought a 944 at around the same time as me, but a cabrio, in “Champagne gold”! To complete the set, I bought a kit of the cabrio, but never got around to building it; This box sat on shelves and moved house 3 times over about 15 years:

When it comes to kits, quality varies a lot – part detail & design, moulding quality & accuracy, materials, clear instructions all go towards making the build a good experience. Tamiya make some of the best models (and I always loved their catalogues), with great detail and excellent quality, but sadly they don’t seem to have made 944 models. I built lots of Tamiya kits – aircraft, hovercraft, motorised tanks, dune buggies, battleships. The best of all was a fantastic Vosper Perkasa MTB (motor torpedo boat), which after weeks of work, I was heartbroken to sink and lose in the Thames in Oxford on its maiden voyage.

These two 944 models are from Italian Italeri (the cabrio), and Japanese Hasegawa. The Hasegawa kit is slightly more complex, with an opening bonnet, pop-up headlights, and working steering linkage. My French back then was very bad (it should be better now, having lived in France for 11 years!) and I liked thinking of Modéle Réduit as meaning “model re-do-it”, even though I knew that wasn’t right. While they were the best known, I didn’t really like Airfix kits; designs tended to be a bit simpler and not as detailed. Much the same goes for Revell. I’ve no doubt some model purists will tell me I’m wrong.

In Christmas 2020, amongst all the COVID-19 lockdowns, I finally set about building the cabrio. I was pretty pleased with the results:

The gold is quite a lot more bling than the real thing was, but I like it. The decals were yellowed with age, very fragile, and disintegrated a bit. I’m particularly pleased with the painting of the rear light clusters, slightly annoyed that I didn’t clean and degrease the body well enough before spraying it, resulting in a slightly uneven finish.

I’ve enjoyed making models for decades now, and it’s been really nice to associate them with good memories too. I’m now tempted to round out the collection with my Dad’s red 944S, my uncle’s succession of purple 968 Sport, 911 993 Carrera 4S, and Cayman R. So much for saving shelf space!

How to use HELO with PHP’s mail() function

I originally wrote this for the HELO-community tracker, and it was subsequently published on BeyondCode’s blog, but I wanted to publish it here as well.


HELO works very nicely if you’re sending via SMTP using PHPMailer, SwiftMailer, etc. – but lots of apps and scripts rely on PHP’s clunky old mail() function, which isn’t nearly as easy to deal with, and harder to point at HELO.

You can configure “proper” mail servers like postfix to work as a local relay, but it’s horribly complicated and confusing to set up. Fortunately there are simpler alternatives that are much easier. Searching for local relay tools (what this is) will usually point you at ssmtp, however, that doesn’t work on macOS. A better option for macOS is msmtp which is present in homebrew and works perfectly. I usually run HELO on localhost port 2500, and I configure msmtp with a config file (stored in ~/.msmtprc; you should also chmod 600 this file as it may contain secrets) like this, which enables the authentication that HELO requires, and I’ve also enabled logging so you can see what it’s up to:

defaults
host localhost
port 2500
tls off
undisclosed_recipients off
account default
auth plain
user test
password password
logfile ~/logs/msmtp.log
syslog offCode language: Bash (bash)

To make the PHP mail function use msmtp, you need to configure the sendmail_path setting in your php.ini file to point at it:

sendmail_path = /usr/local/bin/msmtp -t -iCode language: Bash (bash)

If you’re using homebrew’s PHP package on macOS, I recommend putting config changes like this in a separate .ini file so that it remains update-safe; I put mine in /usr/local/etc/php/8.0/conf.d/marcus.ini.

With those two things in place, PHP’s mail function will submit to the local msmtp binary, which will then relay the message to HELO over SMTP.


Sending via this this route using PHPMailer is very simple because mail() is the default mailer, so you don’t need to configure anything:

<?php

use PHPMailer\PHPMailer\PHPMailer;
require 'vendor/autoload.php';

$mail = new PHPMailer();
$mail->setFrom('from@example.com', 'First Last');
$mail->addAddress('whoto@example.com', 'John Doe');
$mail->Subject = 'Say Hello to HELO';
$mail->Body = '<h1>Hi!</h1><p>This is my HTML body</p>'
$mail->AltBody = 'This is a plain-text message body';

if (!$mail->send()) {
    echo 'Mailer Error: ' . $mail->ErrorInfo;
} else {
    echo 'Message sent!';
}Code language: PHP (php)